React Native Firebase Social Auth with Google on Huawei and other non-GMS devices
Abbreviations used:
- GMS := Google Mobile Services
- HMS := Huawei Mobile Services
Introduction
This article presents an easy way to implement social authentication with Google using Firebase Auth in a React Native application that is compatible with all Android devices (including those with no GMS, eg. Huawei P40 and newer).
When used for multiple social providers (Google, Facebook, Twitter etc.) this method reduces the number of native libraries which otherwise should be installed for each provider. See https://rnfirebase.io/auth/social-auth.
The problem
Since Huawei dropped GMS from their devices, a lot of apps cannot be installed on these devices.
My React Native app uses Firebase for lots of services with the help of the native library, including authentication. I’ve recently switched to a Huawei P40 device and found out that I can not access my own account in my own app anymore (as I was logged in with a Google account on my previous phone).
Just to be clear, (at least in its latest versions) the @react-native-firebase library does not require GMS, even @react-native-firebase/auth does not. However, in the brief documentation of the social authentication section, you need another library for Google SignIn (@react-native-community/google-signin ) and that requires GMS.
The need
The first need (the crucial one): the users of my app should not lose access to their account or to their data when they do actions such as buying a new phone.
The second need (the nice to have one): the users of my app should have the same experience when logging in on different mobile devices.
What didn’t work
Replacing the native library with the Web SDK
The first thought was that React Native has JavaScript and (some) JavaScript libraries work on React Native. Plus, the Web SDK doesn’t know about GMS, HMS or other native dependencies. It’s Web, and Web works on any device. So let’s use the Firebase JavaScript Web SDK.
Well, I discovered that some parts of the Firebase Web SDK work only in a browser, and the authentication service is one of them.
Avoiding the GMS dependent library by implementing the authentication flow myself
That probably could’ve worked, though I chose not to do it as I don’t really want to maintain a 3rd party integration (even when that 3rd party is Google) while there are already official libraries for any platform out there.
What worked
Combining native library with web library in a webview
React Native Firebase has many sub-libraries and my app makes use of most of them. In addition, the library itself is not dependent on GMS so there was no reason to replace it with the Web SDK (even if it had worked fine…but it hadn’t).
On the other hand, the Web SDK was the only official library that could work on all devices (because it’s web), but it works only in a browser…or — you guessed it — a webview.
Very Important!
A webview renders a web (.html) page so this approach requires hosting that page (the login page in our case) on a public server.
First, let’s spot the place with issues. In the React Native Firebase official documentation about Social Auth, there is the following example:
Line 8 uses the GMS-dependent library so that must be replaced. In other words, we have to obtain the idToken using another method. And here’s where the Web SDK and webview kick in. (Note that we don’t have to install the Firebase Web SDK in our native app project. It will be fetched as a <script> inside the webview.)
First, let’s add the webview capabilities:
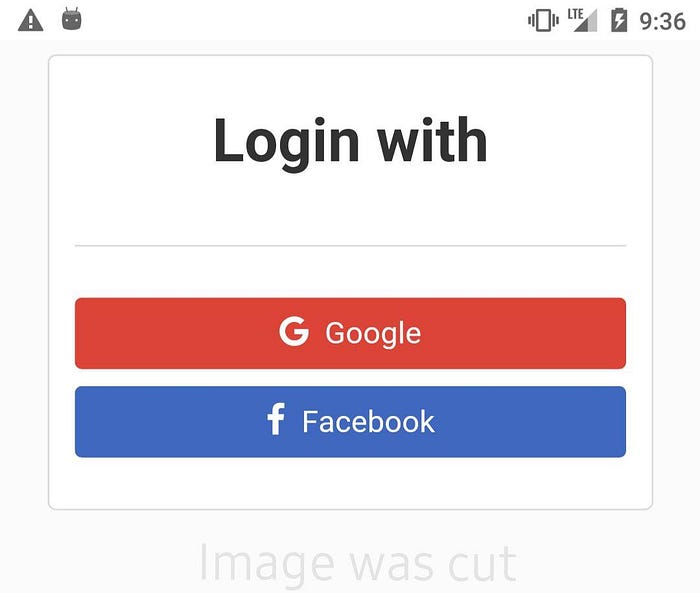
yarn add react-native-webviewNow, let’s design the login page which will be rendered in the webview. I have included the Facebook login just to show it doesn’t matter what social provider is used. Things are the same.
You can find the full source code of the login.html page here, but let’s explain some important aspects of it below.
Let’s look only at <script> tags.
Above we include the Firebase libraries in our page. Now, let’s implement our own script.
Before that, let’s agree that the reason we use a webview is to get some data from it which will help us in the login process.
Q: But what data?
A: Remember the tokenId we could only obtain using that GMS-dependent library? Well, that’s the main reason we want to use a webview: to display a web page instead where the user logs in with Google (or other social auth provider).
Q: How are we going to get the tokenId ?
A: After the user is logged in in the webview, we obtain the tokenId and then we send it to React Native to authenticate the user automatically in the native realm. So the user only have to input his Google credentials only once — in the web page inside the webview.
Q: But how do we send that tokenId from the webview to the native realm?
A: In the login web page inside the webview we can use the window.ReactNativeWebView object which has a .postMessage() method which sends a text message from webview to React Native.
I chose a simple and common structure for the messages sent from the webview, but you can use any format you want. For those who are familiar with TypeScript, this is roughly the type of a message:
{
  "type": "error" | "user" | "event";
  "data": object | undefined;
  "error": object | string | undefined;
}
Let’s define a couple of functions that use this method in order to make our lives easier.
Let’s continue by adding Firebase in the picture.
We only initialized the Firebase library and registered a callback to handle the sign in result, but we didn’t add the code that triggers the sign in process. Let’s add some listeners for the login buttons shown in the UI, so when the user hits one of the login buttons, the login process with the respective social auth provider starts:
The login page is done! In case you don’t have it yet, you can download the whole login.html file.
Now let’s start a HTTP server in the directory where you saved the login.html file. I use python3 for that, but you can use any method you’re familiar with. The idea is to have a web server running athttp://localhost:4000 which lists the login.html file when opened in browser.
$ python3 -m http.server 4000The server is running on your computer, but the React Native app runs on an Android device or emulator. So let’s map that port from your computer to the same port of the emulator, so your app will believe that the server is running in the emulator’s localhost. It will make sense a bit later.
$ adb reverse tcp:4000 tcp:4000Now, you should be able to see the login page by accessing http://localhost:4000/login.html from both your computer and your emulator.
Now let’s move to the React Native code!
The login screen on React Native is a simple component that renders a webview:
In the above snippet there is a simplified version of an actual login screen of an app to clearly show how easy is to receive data from an webview.
In onMessage(event) we receive the data sent from the webview and when the credential is in the data we can authenticate the user with React Native Firebase as described in the Firebase documentation.
That was it!
I really hope this post helps you in your current and future projects.
Please let me know if you think this post can be improved to be more helpful to you.
